They say you must practice 10,000 hours to become an expert in something, and archery is no different. But driving all the way to the archery range every time you want to practice can be really impractical and uncomfortable. So today we are going to discuss how to set up a backyard archery range, so you can train every day and improve your skills dramatically over a short period of time.
Basically, all you need to set up a simple backyard archery range is your archery equipment, targets, distance markers and safety gear (fences and backdrops). First, you should plan your range. After that, you’ll set up your targets and backdrops, measure distances and position your gear.
Many people are intimidated by the small details of building their own range or think it will be hard and expensive to set up. If you feel this way, you came to the right place – we are going to discuss everything you need to know about setting up your own range quickly, effectively and with a minimal initial investment.
Note: Some of the links on this page are affiliate links. This means that if you buy through one of them, I’ll earn a small commission, at no additional cost to you. It’s a great way to support the website.
Fences and backstops – think about safety first
When planning a range, the first priority should be to create a safe area for practice. That’s why we first think of backstops and fences placement, so any stray arrow will be stopped without endangering others. Always remember that a bow is a weapon in your hands, so your number one priority should be to only use it in a safe environment.
The first thing to do is to figure out where you’re going to place your emergency backstops. These are objects that are placed behind the target line, in order to catch arrows in case of a miss. A dirt pile or a padded wood wall should do just fine, but you can purchase dedicated stopping mats or nettings. The targets should be placed just in front of the backstop, but they can be moved up if the backdrops are high enough to catch a missing arrow.
You can create your own DIY backdrop by simply piling dirt up or building and padding a small wooden wall. Another option to consider is to invest in an arrow stopping mat or netting, like this great option I found on Amazon. These could be hanged between trees, tied to a fence or hanged by dedicated poles. These would look much nicer while being easier to set up, be moved and removed. These backstops are professional grade, so you’ll be safe and sure no missing arrow will fly away through them. Prices could go up to 200$ for a quality mat.
If you’re handier and want to save your money, I’ve found a video that details a great build for a backdrop you can build on your own. I think this DIY backdrop is an awesome way to save cash and have a cool project to work on when you have some free time.
Unless you live far away from any other people, you should only set up a backyard range if you have a completely fenced yard. If you live in a suburban area, a fence is crucial to keep any wandering neighbors, pets or kids from wandering into your yard. A solid, high wooden fence will be great for keeping out any passerby and also act as a second emergency stop for any stray arrow. I’ve even seen people hang signs cautioning people from entering the yard, and you can find them on Amazon.
Also have your shooting lines properly marked, to avoid someone walking beyond them while you’re practicing. It will help you determine if you’ve marked the distance properly, but it’s good practice to have a properly marked line, just like in any standard range.
In most cities and states, it is completely legal to fire a bow and arrow in your backyard for practice. But in any case, you should consult with your local office and check for any restrictions or laws with regards to archery. This should be considered especially since a backyard archery range could be visible to neighbors and to any passerby, unlike an indoor basement range. It would be a good idea to mention to your neighbors the idea of building a range in your backyard, to make sure they’re fine with it and are aware not to wander into your yard.
Get some targets for your range
Different archers may have very different goals and skill sets, that affects the type of targets they should choose. For that reason multiple types of archery targets were invented, each has its own purposes, pros, and cons. You can read about my absolute favorite archery targets in my article, where I also lined out everything you need to think about when choosing your first target. But as a quick summary:
- Bag targets are the most basic type of archery targets. They are usually cheap, and easy to set up and move around. If you’re just starting out or want to minimize your initial investment, these may be a good option for you.
- Block targets are targets made of lightweight yet durable foam. They are considered to be of better quality than bag targets but are usually more expensive. They are also very quick to set up and easy to move around.
- 3D targets are targets shaped like life-sized animals or objects. They are an incredible tool for creating realistic, life-like situations. One may use them, combined with blocking objects, to create different archery setups.
The targets will probably the most significant investment in your range, but that’s for a good reason. A quality target will last for years and will be reliable and durable for a lot of practice. It will also be easier to move, and less likely to damage your arrows when removing them. So choose the type of target you want to get by your practice habits, and if you can make it an investment.
If you’re looking for a budget option, first consider looking for a discounted target – many manufacturers sell targets cheaply because of small imperfections in the foam or paint. You won’t be able to notice these after using them for a little while. You should also consider building your own targets – this can be done in several ways, mainly from old rugs compressed together or from foam. These can last for a long while at the fraction of the cost of a standard target.
How to position the targets in your archery range
You can set up your targets in various ways. The most practical is probably placing them in different distance lines while keeping a safe distance between them. This will allow you to practice at different distances at the same shoot, or practice with buddies.
If you are setting up a 3D range, consider making a scene as realistic as possible. Place blocking objects between yourself and the target, and try standing in various positions. The more work you put into creating a life-like scene, the more prepared you’ll be on an actual hunting scenario.
How to place distance markers
Most beginners find it very difficult to learn how to judge distances based on target sighting. The absolute best way to learn that is to use distance markers. These are objects, placed in known distances from the target line. They will allow you to stand in different, known distances from the target, and learn how to judge distances by sighting the target. They can also make it easy to practice at different distances without using a rangefinder every time you start a shoot.
To set up your distance marker, all you need to do is take multiple wooden sticks or stones, and using a meter, place them every 5-10 yards from the target line. You can use a simple distance meter or a cheap accurate rangefinder, like those I suggested in my recommended gear page. After placing them at the correct distances, create a small hole in the ground, at the right size and location, to permanently place them in.
Now that you have these distance markers, you can practice at different distances by standing near them or by standing in a specific location and moving your targets.
Where should you place your bow between shots?
When practicing archery, you will have to put your bow down from time to time – when you run to retrieve your arrows from the target and check your accuracy, or while you sight your targets with your binoculars. It might be dangerous to keep your bow on the ground since someone might step on it, but keeping it on a chair is a bad solution since it can be knocked down. For the exact purpose of placing your bow between shots, bow stands were invented.
Nowadays bow stands are more affordable and can usually hold multiple bows at the same time. I even found a great one on Amazon for you. This is a game-changer for buddy practices. If you don’t want to invest in a professional bow stand, you may build on of your own using PVC tubes or wood. It’s cheaper and might be more comfortable since you may suit it to your own needs.
How long should an archery range be?
Many people are worried they will not have enough room in their yard to make a solid practice location. But a small archery range can be just effective as a larger one, especially for beginners who need more practice with short distance shots. So how long should your archery range be?
You don’t need a huge yard in order to make a decent archery range. It needs to be wide enough to place one or more targets while considering the safety of misdirected arrows. The yard should be a least 20 yards, to allow a decent practice range. The longer you make your range, the longer you’ll be able to practice in it.
If you have a larger yard or area to practice in, you can plan a range with multiple distance markers. A beginner should aim to shoot at about 8-10 yards – it will feel close to the target, but it will allow you to perfect the usage of your equipment and make sure it performs properly. As you progress, you will be able to shoot from more challenging distances – so planning ahead and preparing will enable you to develop your skills, in your own backyard.
Can you leave your equipment out in the range?
A backyard archery range is not a cheap investment. It requires spending a lot of time planning ahead, purchasing items and setting them up. So it’s wise to think about ways to keep your equipment functional for as long as possible, to make your time and money worth your while.
Environmental conditions such as rain and wind may damage your targets and equipment if you leave them on the range. Even though many targets nowadays are designed to be weather-resistant, it’s still a good idea to cover them up, move them inside your house or store them in a safe place, especially come wintertime.
On a day to day basis, consider covering your targets with dedicated target covers, or any durable cover you may find. Since a long exposure to the sun may affect the lifetime of your targets, this is essential. Covering your targets on a day to day basis will also prevent wild animals from ripping your targets up.
When you’re not using your targets for a long period of time, consider moving them inside your garage. Rain, ice and snow are the worst enemies of your targets, so you’ll want to keep them safe come winter. This is especially known for bag targets, which are usually easily ruined by the elements, but also for all other types of targets. I would suggest moving all your equipment inside come winter, to avoid any unnecessary damage to your gear.
Example backyard range planning
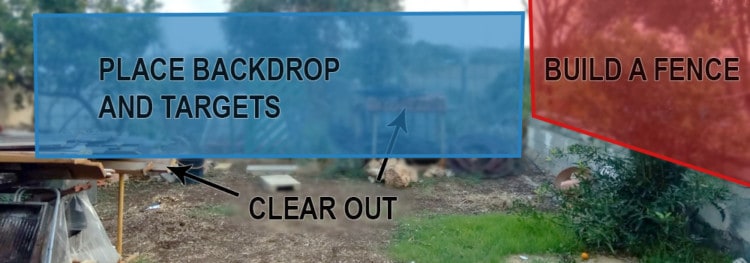
So let’s have a look at my small backyard, and see how I’m planning my own range, using everything we’ve learned in this post. The yard itself is not very long, comes only about 15-20 yards, but it should be enough for daily practice. So let’s consider my process for building a brand new backyard archery range right now.
It’s wise to plan ahead exactly what you’re going to do on a piece of paper, but let me just show you a current picture of my backyard, which I want to turn into a range.

It’s a bit hard to see, but there are a lot of tools and woodworking equipment just scattered around the yard. So the first thing I have to do is clear everything out to ensure that I have the space I need to practice. I don’t have a lot of big trees, which means that just by moving my gear away I’ll have all the room I need.
After that, I’ll start working to build a higher wooden fence. As we discussed, it should be high enough to catch any flying arrow that I might miss, cover all directions of the range.
Once that’s done, I can simply place my backdrop at the edge of the range (which is where I took the photo). I think I have enough room for two targets at the back, so I can shoot with any buddy that comes over to practice. It would be smart to also place the distance markers at this point.
Any other gear I need, like a bow stand, covers for the targets and signs, I’ll order at this point. But since it’s not essential, I can actually start practicing at this point.
Yes, it’s seriously that simple to create your own range. You don’t need much, and though having more gear can be comfortable, the bare essentials are really enough to have a proper place to practice. I hope seeing this real-life example of me planning how to build my own range helped you see how simple it is.
Conclusions
Setting up an archery range in your own garden can be really simple and easy, and allow you to practice and quickly improve your skills. While setting it up, make sure to begin with the end in mind, and plan your range to suit your needs. Make sure to consider the safety of yourself and the people around you first, and take errors into consideration. If you do that, I’m sure you’ll have an amazing archery journey in your own backyard.


