Have you ever tried to shoot your bow, and had your arrow hit consistently off of the center, or even out of the target? Well, your sight just might’ve been a bit off and needed some good tuning and care.
Adjusting your bow sight is pretty simple. Find out how off each sight pin is by shooting a group of arrows at the right distance, and finding how off it is. Set the elevation and windage of your pin accordingly. Keep shooting from higher yardages and adjust the different pins, until you are happy with how your sight is set.
Fixing your equipment is obviously not a magic pill, and you should always ensure that you’re properly shooting the bow. To be more exact, you’ll probably fail to properly adjust your sight if your posture isn’t correct. If you’re having trouble with consistent shooting, I’d suggest checking my archery posture guide where I detail the essential things to focus on with your shooting form.
In this article, you’re going to learn everything you need to know about adjusting your bow sight. If you’re a beginner this might feel a bit intimidating, but I’ve made sure to explain everything you need to know.
So let’s dive right in!
Why is adjusting your sight important?
It’s incredibly important for archers at any skill level to adjust their bow sight, to achieve the best accuracy they can. Shooting improper gear can really decrease your accuracy for no good reason. If you’re trying to get ahead with the sport, you don’t need fancy equipment, but you do need to make sure the gear you do have is properly set.
Since the physical qualities and technique of every archer are a bit different, a sight is adjusted for a specific person and will not be as accurate for others. It will still be pretty good for other people using the bow, but it’ll perfect for the person tuning it.
It’s a good idea to adjust your sight is if you just mounted it on your bow, if haven’t used a bow in a while or if you just found that your shouts are consistently grouped away from the point you aimed to.
Since every different bow sight is a bit different, it’s highly recommended that you first refer to the sight’s owners manual. It will contain all the information you need in order to locate and identify each screw in the sight.
Doing this will ensure that you don’t make any mistake and ruin your sight by accident and that you level and adjust it as quickly and easily as possible. If you don’t have the physical manual of the sight, you’ll usually be able to easily find it on with a quick google search.
What are bow sight axis?
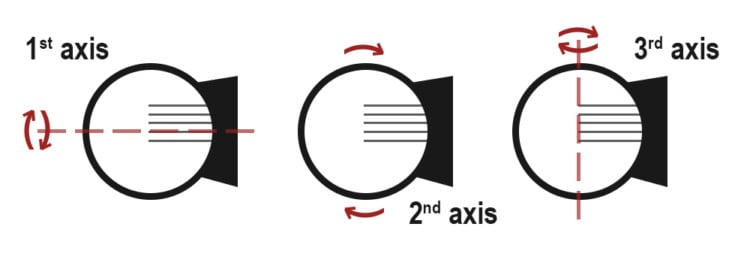
When adjusting your bow sight, what you’ll be starting with is setting the axis of you sight correctly. These are the 3 element that determite the position on your sight related to your bow.
So the bow axis simply are:
- First axis: When looking direcly through the sight, this will determine that the top of the sight is directly above the bottom. First axis adjustments are generally only found on adjustable sights.
- Second axis: This will determine that that sight pins are exactly levelled related to the ground.
- Third axis: This will set the rotation of the sight so the left side and the right side of the sight are the same distance to you.

Remember that before you start adjusting your bow sight to suit your needs, it’s important to make sure it’s perfectly leveled.
A sight that was not installed and leveled correctly might shoot arrows diagonally and behave in an unexpected manner, which is something you sure don’t want to happen out in the range. This is why we don’t simply skip to adjusting the pins.
Step 1: Make sure your sight is properly installed
Before you start tuning your bow sight, you should make sure a few things are correctly set. First, you should check that your sight was installed correctly. This means that your sight was installed at the correct position and is properly mounted on the bow. The pins themselves should be centered, allowing you to have full control and a proper initial position.
I’d also suggest not using a peep sight when tuning the bow. Since peep sights are adjusted to properly anchor when aligned with the standard sight, they might add more error if not properly adjusted, which you’ll mistake for error from your standard sight. Don’t know what I’m talking about? Try reading my peep sight guide.
Check that you’ve already tuned every other part of your bow – tuning the sight should be the last step of a proper bow tune. It is important to also check that all your arrows are of the same weight and point design, otherwise, the inconsistent behavior might make the adjustment ineffective.
Step 2: adjust the first axis
Even if you have a fixed sight, it’s probablity a good idea to check the first axis level. To check and adjust the first axis, attach a level to the flattest area of the mounting area. Generally if you had a professional mount you sight, it should be at least close to level.
Now even if you don’t have a moving sight and you need to make some adjustments, typically small washers can be added between the sight and the riser. These will usually be enough.
If you have an adjustable sight, you’ll be able to adjust the level with the first level adjustment screws.
Step 3: adjust the second axis
To level your bow sight’s 2nd, simply match the bubble position on your sight’s level with an external level attached to your bow.
The easiest way to do that is to first level the bow, mount it so it doesn’t move much, then adjust the sight using the second axis adjustent screws to match your bow.
Step 4: adjust the third axis
To adjust the 3rd axis draw the bow and point forwards, moving towards the ground until you reach a 45-degree angle. Change the sight’s tilt so the bubble remains in the same position throughout the motion.
This adjustment will help eliminating torque that is introduced when your bow is a full draw. The torque will not be hard to notice on the horizontal plane, and that’s why the complex motion is necessary.
Basically, to level the 3rd axis you will need to draw your bow and face it level to the ground, and slowly move it to a 45-degree angle towards the ground. Watch the bubble on the level while moving – if it moves to the side you will need to adjust it. Repeat this process until the bubble remains level throughout the entire range of motion.
If your sight doesn’t feature third axis adjustments, you might be able to add dedicated shims the the front and back screws, similarly to the first axis adjustments. If it does have this feature, the adjustment will be a matter of turning the third axis adjustment screws.
After making sure that your sight is perfectly level, you can start shooting in order to adjust and fit the sight pins to your needs.
Step 5: adjust the sight pins
The process you need to do to adjust and tune your bow sight pins can be described in a few short simple steps.
- Begin by shooting from about 10 yards to your target. Shoot at least 3 arrows, and form a group as tight as possible.
- Aim to the center of the target at all times while shooting. You’re checking for consistent error in the shot, so your shots should be consistent.
- After you finish shooting, approach the target and find the center point of the group.
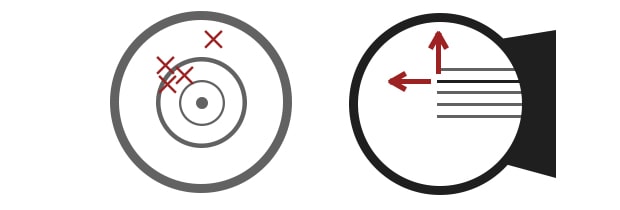
- Set the elevation of your pin and later set the windage. Move your pin to the same direction your group center deviated to.
- Repeat this process at larger and larget distance to adjust all the pins to the best positions.
The basic principle is to move your pin to the direction your arrows go to relative to the aiming point. So if for example your arrows go above the center of the target – move your pin upwards. Since you point the edge of your pin to the target, moving it upwards will make you aim lower, so your shots go closer to the center of the target.

You should start by shooting relatively close to the target, and move back to a larger and larger distance in order to adjust all your sight pins correctly. It’s just a simple process so you don’t forget setting any pin.
It’s usually recommended to set your pins to 10-yard increments, but you should take into consideration your bow and the distances you are comfortable shooting in. Some bows will shoot arrows in somewhat of a straight line at 20 yards, while others will drop them a few inches in a similar distance.
To make things easier, at every distance marker make sure to shoot at least a couple of arrow groups, to set the elevation and windage of the pins. You can do both based on the same group of arrows, but repeating the process more than once will almost completely eliminate the effect of human error.
You should adjust your bow sight based on packed groups of arrows – a single arrow or a group spread out too far usually means the group was significantly effected by human error and should not be trusted.
Consider using at least 3 arrows to find the center point of your shots. Don’t use “outlier” arrows (arrows that are far away from the packed group) for your adjustment.
How to set your bow sight pins
For most bow sights to set the elevation you need to loosen a screw or a retaining nut on the side of your sight, which will enable you to slide your pins up or down. To set the windage you’ll usually tighten and loosen a small adjustment screw.
The position of your pin determines the angle you shoot at. So basically it will require relatively big changes in the pins positioning for short distance adjustments, related to larger distance marks.
Don’t feel intimidated if you feel like you are moving your pins a lot at short distances. In any case, fine-tuning your sights by shooting several groups and adjusting accordingly will ensure greater accuracy.
Some sight feaure micro adjustment adjustment screws that might enable you to fine tune the position on the pins, but for most beginners this isn’t really important.
Consider getting professional help
I’m always suggesting archers should get more involved with their gear, learn how it works and how to adjust it. Since your sight is a pretty simple tune that doesn’t involve many tools and complicated, accurate equipment, it’s a good place to start.
But if it’s the first time you’re handling your bow, or you’ve never even practiced archery before, I suggest you take the bow to a local archery shop and get it tuned. It doesn’t cost much, and they’ll probably do much better than you will – archers shops typically know they’re business.
Getting started with archery can be a lot. There’s a ton of things to focus on, and so you don’t want to deal with a badly tuned sight with everything. You should have your gear in the best shape you can when starting out, so you can focus on what’s important – developing good posture and form.
Conclusions
Leveling and adjusting a bow sight to suit your needs is one of the first things you should do after purchasing a new bow, mounting a new bow sight or after taking a long break from archery. It will help you achieve a better aim with almost no effort or change in your technique.
It’s also pretty easy – all you need to do is shoot a few arrows and hone into the optimal position of the sight pins. I’ve detailed how to make the most essential adjustments. Remember to always consult with the user’s manual of your specific sight, since every sight is a bit different, to avoid any unnecessary time waste or potential damage to your sight.
If all of this still seems like too much of a hustle to you, consider getting professional help in any of your local archery shops for an adjustment. You can also check my instinctive archery guide if you shoot a recurve bow or a longbow and want to give up using your sight altogether (wink wink). In any case, I hope you found this guide helpful!


